Learning how to propagate succulents is a skill that every plant newbie wants to master!
I love propagating succulents because it is a cheap and easy way to produce new, additional plants! Some succulents propagate rapidly and require little effort from the grower. Others need a bit more time and extra TLC to develop into new plants.
In this post I will introduce you to the four different ways you can propagate your succulent. You will receive a step-by-step walkthrough on each of the four techniques.
These techniques are:

But before we get too ahead of ourselves, what exactly is propagation? Propagation is the process of taking some component of a mature, healthy succulent and growing this component into a new plant. All of your succulents have the ability to create an infinite number of new succulents from their leaves or stems.
Now that you know what propagation is, let’s get started!
How to propagate succulents from leaves
New succulents can be successfully grown just from the leaves of the mother succulent! Like other propagation techniques, this will give you hundreds of dollars worth of plants for free!
It is important to choose plump, healthy leaves to propagate. Do not pick leaves that are limp, dry or wrinkled. Look at the color of the leaf. A vibrantly colored leaf is a healthy leaf. Don’t choose one that is pale or translucent. This will give you the best chance of growing a new succulent.
Depending on how your succulent grows will dictate when you want to propagate. You can propagate succulent leaves from a bushy succulent with woody stems, such as jade plants, at any time. Propagate on a whim or after you have done some pruning. There are enough various branches on these types of succulents that there won’t be noticeable bare spots when you pick a handful of leaves.
For vertical growers such as Echeveria it is best to propagate using leaves when the succulent is beginning to stretch out or when it is getting too big for your taste.
The first step in the propagation of leaves is to remove the leaf from the mother plant. This is extremely important that the entire leaf is removed. If any part separates from the leaf and stays on the mother plant, your chances of growing a new plant decreases substantially.
I find that I am most successful in removing the entire leaf using a wiggle-and-pull method. Firmly grasp the leaf at the base, closest to the stem. Gently wiggle the leaf back and forth while pulling back. This helps break all of the connections between the leaf and the stem slowly and evenly.


Repeat this process several times. Remember that no matter how perfect your care is, you won’t have a 100% success rate so gather more leaves than you want new plants.
The second step is to spread the leaves out in a cool, dry area away from the sun. I personally place all of my leaves on a paper towel or cutting board on a corner of my kitchen counter. Keep your leaves here for three to five days. This allows the ends to dry out and callous over. Doing so will prevent the leaf from rotting once watered.

When the end of the leaf appears matte instead of shiny and wet, this is when it has fully calloused over.
Gather pots and soil to start the third step. I like to use shallow but wide two inch deep plastic plant saucers. Using these containers will give you greater surface area for more leaves. You also won’t waste soil. New plants don’t develop deep roots so there is no need to use a large planter.
Gently place the ends of the leaves just barely underneath the soil. Arrange them in a circle with the ends facing inwards. This helps prevent leaf rot when watering because you will only water a specific area. Excess water is less likely to be misted on the entire leaf.

Now is the time to start watering! I use a misting spray bottle. Focusing just on the area around the ends of the leaves, spray the soil everyday or as often as needed to keep the soil moist. You don’t want the soil to be drenched, just damp to the touch.
Your growing baby succulents will need lots of light for energy so place the leaves in a place that receives six plus hours of sunlight per day!
It’s important to be patient because you won’t see growth overnight…or even for a couple of weeks. Don’t worry, these little leaves are working away to sprout roots and baby plants. Depending on the plant, it can take about three weeks to see any changes.
As your new plant begins to grow, the leaf begins to shrivel. This is because the leaf that the new plant is growing from is its source of food and energy.
Once the original leaf is dry and an ample root system has been established, the leaf is mature enough to replant. Gently remove the old leaf from the new plant. Pull the plant out of the soil, shaking excess dirt off of the roots. Transplant your new succulent into fresh soil and top with fine pebbles to keep the plant in place.

Don’t water your new succulent for a week after transplanting. After this initial period, begin a watering schedule just as you would with mature succulents, allowing the soil to dry out completely before the next drenching of water.
How to propagate succulents from stem cuttings
Propagating succulent cuttings from a stem follows a very similar process as leaf propagation. The best plants to use for propagating stem cuttings are branching succulents and those that have stretched out leaves, typically those with rosettes.
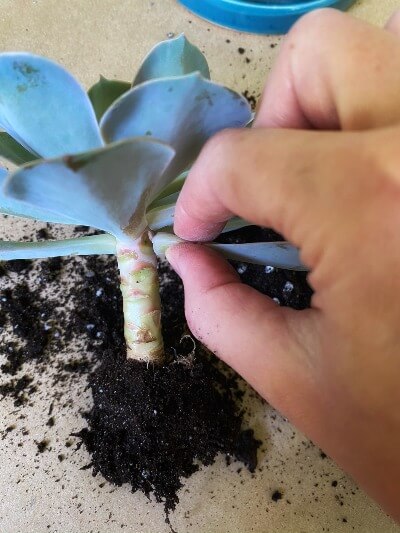
Most importantly, pick a branch or group of branches that are healthy. The branches and leaves should be firm, not limp. Once you have identified the branched stem you want to propagate, use a sharp sterile knife or sharp sterile pruning shears to cut the stem as close to the base as possible. Ensure the cut is clean using a single swift motion.
The ends of the stems need time to callous over. The thicker the stem, the longer it will take. Generally if the stem is a half inch in diameter or less, this will take approximately four to seven days. Allow the stems to callous over in a cool, dry area of your house.
Plant this new cutting into fresh soil. Bury one to two inches of the stem in the soil. Pack the soil firmly around the base and cover with tiny stones to secure the new plants position as it develops roots. Begin a typical drench-to-dry succulent watering schedule after one week.
I like using stem cuttings because it has a higher success rate than leaf propagation and it is a faster process. Because the clipping is already matured, it has less growing to do and will grow roots much quicker than leaves.
How to propagate succulents from offsets
This is the easiest way to propagate succulents because all of the work has been done for you! Offsets are tiny baby flowers that grow out from the base of the mother plant. I have even had offsets grow higher up on stems after pruning dead leaves off of Echeveria!

Offsets, also called pups, grow from the base of the plant, so they aren’t always obvious at first glance! Search underneath the bottom most leaves and move the soil around. When you find pups, gently brush away the surrounding soil to find the point of attachment to the mother plant.
The age of the pup will dictate the method of removal. If the pup is younger it will be directly attached to the mother plant and no roots will have formed. For newer pups use a sharp sterile knife or sharp pruners to cut it away from the mother plant. Let the base of the pup dry out for three to five days before replanting.
If the pup, or offset, is older and has developed roots, carefully detach the root system from the mother plant. There may still be some pup to mother plant attachment in which case you will need to use a sharp knife. Let the end callous over for three to five days before repotting.
Because there will be minimal to no roots on your new offset depending on its age, create a shallow indentation in the soil of the new planter. Put the new pup in the hole and gently pack the soil around the base to stabilize.
Do not water until after the first week.
How to propagate succulents from seeds
Growing new succulents from seeds is the slowest of the propagation techniques. It takes a couple weeks before the first sprouts pop up from the soil and can take months before the new plant takes shape. With that being said, propagating from seeds is absolutely possible and can be an extremely satisfying process.

The first step in propagating seeds is to loosen the protective coating around the seed. Fill a small bowl with warm water. Let the seeds soak in the water for thirty minutes.
While the seeds are soaking, prepare a shallow dish with two to three inches of succulent potting soil. I like to mist the soil thoroughly with warm water so it is moist when I plant the seeds.
Sow the seeds by placing one seed every inch apart. This allows space for future growth. Once the seeds have been spread, lightly apply a minimal dusting of soil on top of the seeds for protection.
Seeds sprout best when in a warm environment between 75° to 80°F. This can be achieved by placing the dish in a sunny window that receives light for the majority of the day during the warm months. If you are doing this in the winter, it is best to place your dish on a heated seed mat.
Succulent seeds like humid environments. By covering your dish with saran wrap with a couple air holes scattered throughout, you can make a mini greenhouse for your seeds.
Water the seeds as needed to keep the top layer of the soil damp. Use a spray bottle to mist the soil so the seeds are not disturbed.
Final Thoughts
Propagating succulents is a great side hobby! Your friends and family are sure to enjoy all the new plants coming their way. If you have the patience, these techniques will save you a lot of money when growing your collection.
Watching your baby plant grow into a mature healthy succulent is rewarding. Don’t get frustrated if you aren’t successful the first couple of times! With a little practice you will be growing a greenhouse worth of succulents in no time.